Friday, December 4, 2009

Releasing a multi-module project using the maven-release-plugin

To create a release the maven-release-plugin will execute 2 steps: prepare and perform. Let's first describe those steps.

Prepare the release

Preparing a release executes the following steps:
  1. Check that there are no uncommitted changes in the sources
  2. Check that there are no SNAPSHOT dependencies
  3. Change the version in the poms from x-SNAPSHOT to a new version (you will be prompted for the versions to use)
  4. Transform the SCM information in the POM to include the final destination of the tag
  5. Run the project tests against the modified POMs to confirm everything is in working order
  6. Commit the modified POMs
  7. Tag the code in the SCM with a version name (this will be prompted for)
  8. Bump the version in the POMs to a new value y-SNAPSHOT (these values will also be prompted for)
  9. Commit the modified POMs
To execute this step, run
mvn release:prepare

Perform the release

Performing a release does the following:
  1. Checkout from an SCM URL with optional tag
  2. Run the predefined Maven goals to release the project (by default, deploy site-deploy)
To execute this step, run
mvn release:perform

Which strategy to use to release a multi-module project

Let's consider a multi-module project with the following architecture :

_ project-parent
|_ _ project-child-1
|_ _ project-child-2
...
|_ _ project-child-n
|_ _ pom.xml

The parent project is a POM project and the parent of the other modules.

When you have a lot of child modules, the easiest way to release your projects is to release them all at the same time by executing the prepare and perform command at parent level. You certainly don't want to release your modules one at a time because you don't have time for that.

There is 2 issues with this strategy :

  1. The prepare step will fail if it finds any SNAPSHOT dependencies in one of your child module
  2. If you resolve the first problem, you will be prompted for each child module version. This one is not really a major problem but it can be a pain in the ass if you don't want to use the default versionning.

The first issue can be resolved by not setting the version of your child module. Remember, every child module inherits the groupId and the version of its parent module.


The second issue can be resolved by setting the autoversionsubmodules to true in the maven-release-plugin configuration.


Here's how to define the plugin in the POM file of the parent project :

<plugin>
<groupid>org.apache.maven.plugins</groupid>
<artifactid>maven-release-plugin</artifactid>
<version>2.0-beta-9</version>
<configuration>
<goals>deploy</goals>
<autoversionsubmodules>true</autoversionsubmodules>
</configuration>
</plugin>

By setting the autoversionsubmodules to true the maven-release-plugin will not prompt you for the version of your child modules.


Tips : The prepare step does a lot of things and you can hesitate to execute the command the first time you're releasing a project. In that case use the DryRun option to simulate what will happen :
mvn release:prepare -DdryRun
The DryRun option will create the following files :

- pom.xml.next : what the projects pom looks like after the release
- pom.xml.releaseBackup : what the pom looked like before
- pom.xml.tag : the pom for the tagged version of project
- release.properties : the information about the release of the project

If you're happy with that, execute the mvn release:clean command to clean the generated files.

Resources :
http://maven.apache.org/plugins/maven-release-plugin/
http://maven.apache.org/guides/mini/guide-releasing.html

Saturday, October 24, 2009

Managing and sharing your eclipse configuration with Pulse

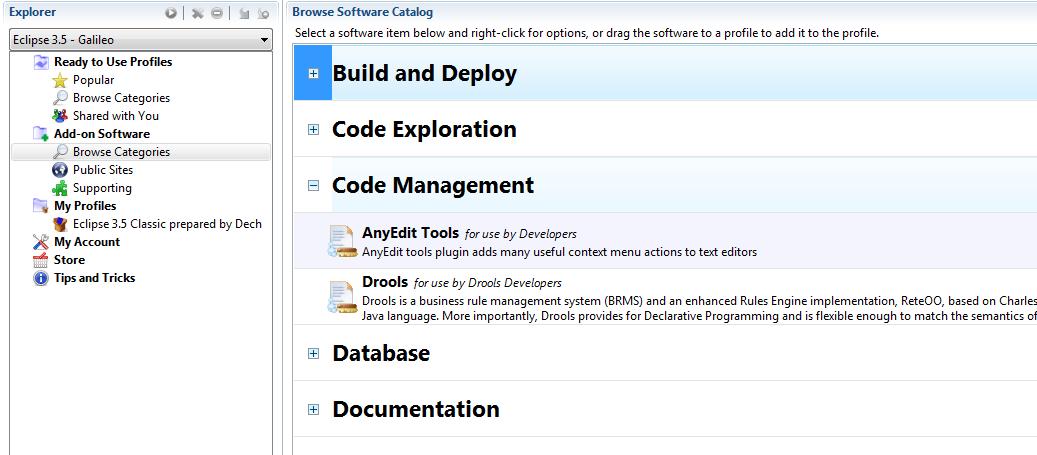
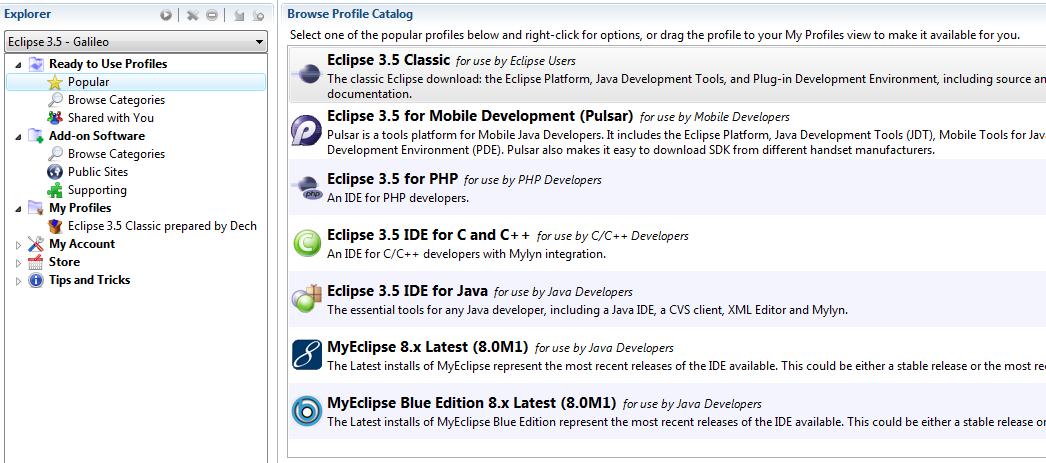
Pulse is a tool designed for development teams to share your eclipse configurations. You can create various profiles based on known eclipse builds and add your own plugins from the pulse catalog or an update site. You can even customize the launch arguments and the workspace settings. Once your eclipse profile is ready, you just have to run it and your eclipse installation will be ready in a few minutes with all your plugins and custom settings. Pulse provides a multithreaded download so the installation is quite fast.

Here's how to proceed :

1. You have to download and install the pulse application from the pulse website.

2. Create an account.

3. Choose your eclipse base bundle from the catalog.


4. Add your own eclipse plugins from the catalog or from an update site.


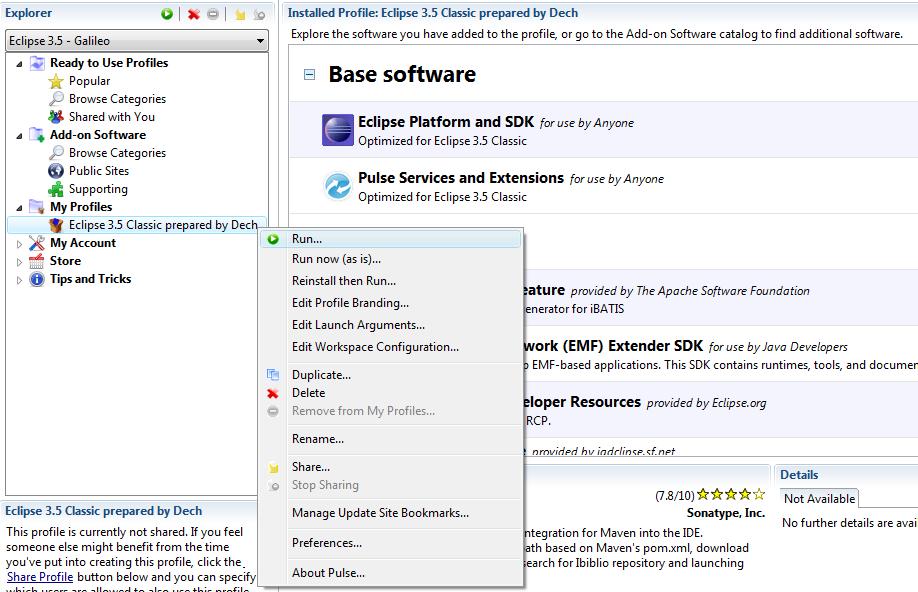
5. The last step is to run your profile.


Pulse will create an entry in your program files directory where you can find your new eclipse installation.

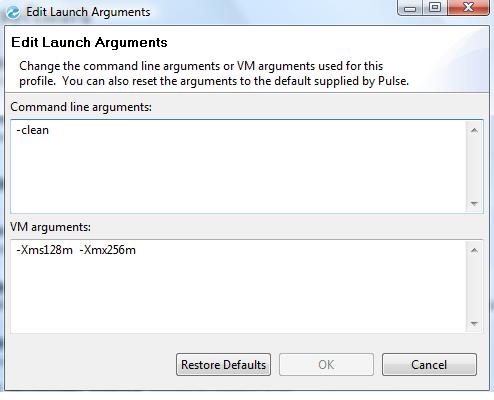
Using Pulse you can customize the launch arguments of your eclipse installation.


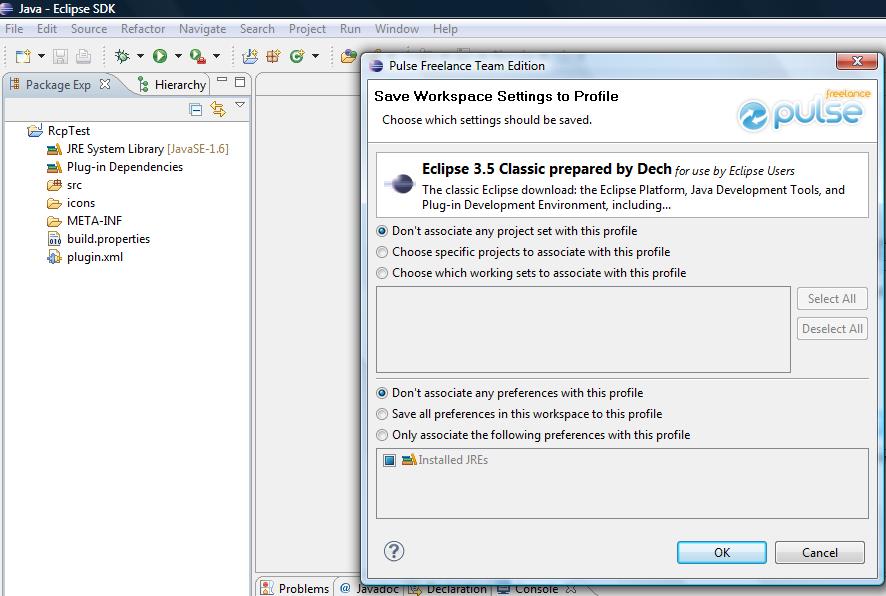
And save your eclipse workspace settings directly from your eclipse installation as shown in the screenshot above.

Sunday, September 20, 2009

Monitoring EhCache with JMX and Spring

EhCache provides an easy way to manage your caches with JMX. The ManagementService class is the API entry point. You can easily integrate it in your Spring configuration files.

Here's how you can do it :

<ehcache:config configLocation="classpath:config/ehcache.xml" failQuietly="true" />

<ehcache:annotations>
<ehcache:caching id="yourCacheModel" cacheName="yourCache"/>
</ehcache:annotations>

<bean id="mbeanServer" class="org.springframework.jmx.support.MBeanServerFactoryBean">
<property name="locateExistingServerIfPossible" value="true" />
</bean>

<bean class="net.sf.ehcache.management.ManagementService" init-method="init">
<constructor-arg ref="cacheManager" />
<constructor-arg ref="mbeanServer" />
<constructor-arg value="true" />
</bean>

After doing this, you will have access to your caches configuration and operations such as cache flushing. You will also have access to useful statistics like cache hits, cache misses, object count and some more. These statistics will give you critical information on how to configure your caches for an optimal use.

Resources :
- JMX Management and Monitoring from the ehcache official documentation.

Saturday, September 19, 2009

Annotation driven Caching with EhCache and Spring

Caching is the key of fast applications. The Spring modules framework provides us with an easy way to cache the return of our methods using java 5 annotations.

Here's an example :

ehCache.xml :

<ehcache>
<defaultCache
maxElementsInMemory="500"
eternal="true"
overflowToDisk="false"
memoryStoreEvictionPolicy="LFU" />

<cache name="getTestCache"
maxElementsInMemory="50"
eternal="true"
overflowToDisk="false"
memoryStoreEvictionPolicy="LFU" />
</ehcache>


applicationContext.xml :

<beans xmlns="http://www.springframework.org/schema/beans"
xmlns:xsi="http://www.w3.org/2001/XMLSchema-instance"
xmlns:ehcache="http://www.springmodules.org/schema/ehcache"
xsi:schemaLocation="http://www.springframework.org/schema/beans
http://www.springframework.org/schema/beans/spring-beans-2.5.xsd
http://www.springmodules.org/schema/ehcache
http://www.springmodules.org/schema/cache/springmodules-ehcache.xsd">

<ehcache:config configLocation="classpath:ehcache.xml" />
<ehcache:annotations>
<ehcache:caching id="getTestCacheModel" cacheName="getTestCache" />
<ehcache:flushing id="getTestFlushModel" cacheNames="getTestCache" />
</ehcache:annotations>

<bean id="customerManager" class="services.impl.CustomerManagerImpl"/>

</beans>

The CustomerManager interface :

import org.springmodules.cache.annotations.Cacheable;
import org.springmodules.cache.annotations.CacheFlush;
import vo.Customer;

public interface CustomerManager {

@Cacheable(modelId="getTestCacheModel")
public Customer load(long customerId);

@CacheFlush(modelId="getTestFlushModel")
public void add(Customer customer);
}

In order to do a simple test, we create a simple implementation of the CustomerManager interface :

import services.CustomerManager;
import vo.Customer;

public class CustomerManagerImpl implements CustomerManager {

public Customer load(long customerId) {
//This part should normally call a DAO
return new Customer("Rene", 34);
}

public void add(Customer customer) {
//This part should normally call a DAO
}
}

And the test class :

import org.springframework.context.ApplicationContext;
import org.springframework.context.support.ClassPathXmlApplicationContext;

import services.CustomerManager;

public class Main {

public static void main(String[] args) {
ApplicationContext context = new ClassPathXmlApplicationContext("applicationContext.xml");
CustomerManager customerManager = (CustomerManager) context.getBean("customerManager");

System.err.println("Loading customer");
customerManager.load(455L);

System.err.println("Loading customer again");
customerManager.load(455L);

System.err.println("Adding customer");
customerManager.add(new Customer("Jean",34));
}
}

The final step is to add this simple log4j.properties file to the classpath :

# Set root category priority to INFO and its only appender to CONSOLE.
log4j.rootCategory=DEBUG, CONSOLE

# CONSOLE is set to be a ConsoleAppender using a PatternLayout.
log4j.appender.CONSOLE=org.apache.log4j.ConsoleAppender
log4j.appender.CONSOLE.layout=org.apache.log4j.PatternLayout
log4j.appender.CONSOLE.layout.ConversionPattern=- %m%n

Here's the log result of the execution of this class :
Loading customer
- Attempt to retrieve a cache entry using key <1187678266|32099260> and cache model
- Retrieved cache element
- Attempt to store the object in the cache using key <1187678266|32099260> and model
- Object was successfully stored in the cache
Loading customer again
- Attempt to retrieve a cache entry using key <1187678266|32099260> and cache model
- Retrieved cache element
Adding customer
- Attempt to flush the cache using model
- Cache has been flushed.

We can see that the first time we call the load method, the retrieved Customer object is stored in the cache. The second time, the object is directly retrieved from the cache. When we call the add method the cache is flushed.

Here's the maven pom file I used :

We'll use the 0.8 version of springmodules, the latest in the maven repo central. This version has dependencies on spring 2.0 and ehcahe 1.1. In order to use the latest library we will add our own version of spring (2.5.6) and ehcache (1.6.2) and excludes the old ones. We have to exclude also all the proprietary libraries which should be optional but are not.

<dependencies>
<dependency>
<groupId>org.springframework</groupId>
<artifactId>spring</artifactId>
<version>2.5.6</version>
</dependency>
<dependency>
<groupId>net.sf.ehcache</groupId>
<artifactId>ehcache</artifactId>
<version>1.6.2</version>
</dependency>
<dependency>
<groupId>org.springmodules</groupId>
<artifactId>spring-modules-cache</artifactId>
<version>0.8</version>
<exclusions>
<exclusion>
<artifactId>gigaspaces-ce</artifactId>
<groupId>gigaspaces</groupId>
</exclusion>
<exclusion>
<groupId>jini</groupId>
<artifactId>jsk-lib</artifactId>
</exclusion>
<exclusion>
<groupId>jini</groupId>
<artifactId>jsk-platform</artifactId>
</exclusion>
<exclusion>
<groupId>jini</groupId>
<artifactId>mahalo</artifactId>
</exclusion>
<exclusion>
<groupId>jini</groupId>
<artifactId>reggie</artifactId>
</exclusion>
<exclusion>
<groupId>jini</groupId>
<artifactId>start</artifactId>
</exclusion>
<exclusion>
<groupId>jini</groupId>
<artifactId>boot</artifactId>
</exclusion>
<exclusion>
<groupId>jini</groupId>
<artifactId>webster</artifactId>
</exclusion>
<exclusion>
<groupId>jboss</groupId>
<artifactId>jboss-cache</artifactId>
</exclusion>
<exclusion>
<groupId>jboss</groupId>
<artifactId>jboss-common</artifactId>
</exclusion>
<exclusion>
<groupId>jboss</groupId>
<artifactId>jboss-jmx</artifactId>
</exclusion>
<exclusion>
<groupId>jboss</groupId>
<artifactId>jboss-minimal</artifactId>
</exclusion>
<exclusion>
<groupId>jboss</groupId>
<artifactId>jboss-system</artifactId>
</exclusion>
<exclusion>
<groupId>jcs</groupId>
<artifactId>jcs</artifactId>
</exclusion>
<exclusion>
<groupId>xpp3</groupId>
<artifactId>xpp3_min</artifactId>
</exclusion>
<exclusion>
<groupId>ehcache</groupId>
<artifactId>ehcache</artifactId>
</exclusion>
<exclusion>
<groupId>org.springframework</groupId>
<artifactId>spring</artifactId>
</exclusion>
</exclusions>
</dependency>
</dependencies>


In conclusion, annotation driven Caching with EhCache and Spring is very straightforward to implement.

However, be aware that the springmodules framework is in a dead status and have some unresolved issues you should be aware of. You can see those issues listed here. Take a look at it before using it though most of the issues have workarounds. There is also a 0.9 version you can only download because it has never been released in the maven central repository.

A project named Spring modules fork has been created to revive this useful project and to make it evoluate. They've created a 0.10-SNAPSHOT version hosted on their own server.

Saturday, July 11, 2009

Introducing the Builder Design Pattern

Static factories and constructors have limitations when dealing with objects with large numbers of optional parameters.

A classic solution is to use multiple constructors. The first constructor will have only the required parameters. The second one, the required parameters and a single optional parameter. The third one, the required parameters and two optional parameter and so one until the last optional parameter. The problem with this solution is that you can easily invert two parameters when constructing the object.

Another solution is to use the JavaBean pattern, in which you call the paramterless constructor and call the setter methods to populate your objects. The problem with this pattern is that you cannot enforce consistency. Your objects may be in an inconsistent state if you do not set the required parameters.

A third solution is to use the builder design pattern.

Here's an interesting implementation of this design pattern described by Joshua Bloch in the book 'Effective Java Second Edition' (which is, by the way, a book to put in every programmer hands).

The client calls a constructor with all the required parameters and gets a builder object. Then the client calls methods on the builder object to set each optional parameters. Finally the client calls a build method which generate an instance of the object which is immutable. Immutable objects have a lots of benefits and may be very useful.

public class Customer {

private final String name;
private final String surname;
private final int age;
private final String address;
private final String email;

public static class Builder {

//Mandatory parameters
private String name;
private String surname;

//Optional parameters
private int age;
private String address;
private String email;

public Builder(String name, String surname) {
this.name = name;
this.surname = surname;
}

public Builder age(int val) {
age = val;
return this;
}

public Builder address(String val) {
address = val;
return this;
}

public Builder email(String val) {
email = val;
return this;
}

public Customer build() {
return new Customer(this);
}
}

private Customer(Builder builder) {
name = builder.name;
surname = builder.surname;
age = builder.age;
address = builder.address;
email = builder.email;
}
}

A good practice is to check the invariants in the build method and send an IllegalStateException if one of the attribute is invalid. This way, you will always be sure that your object is valid after being instantiated.

Here's how the client code looks :

Customer customer = new Customer.Builder("John", "Doe").age(25).email("johndoe@gmail.com").build();

The result is a client code easy to write and read.

Resources : To mutate or not to mutate ?

Wednesday, May 20, 2009

Testing private methods using Reflection

- What about testing private methods ?
- Hum... You can't because they're private dummy.
- And what about using reflection to make them accessible ?

Because we don't have access to private methods, we generally don't test them. This can be a weakness in your testing strategy. Private methods are usually a very sensible part of your code. I've have seen a lot of developers modifying the visibility of their code from private to protected. That's a bad practice. Don't change the visibility of your code for testing purposes.

A solution consists of using reflection to make these private methods accessible for testing.

I really don't like to use reflexion in my application code because if someone is doing some refactoring like renaming a method and forget to update the reflexive code part, you will get a very bad runtime exception. If it is possible to perform an operation without using reflection, then it is preferable to avoid using it.

Test code is not application code. Your tests does not go into production, that's why I'm not afraid of using reflection in my test classes.

Here's an example :

MyClass.java

public class MyClass {

private String myPrivateMethod(Long id) {
//Do something private
return "SomeString_" + id;
}
}

MyClassTest.java

import java.lang.reflect.Method;

import static org.junit.Assert.*;
import org.junit.Test;

public class MyClassTest {

private MyClass underTest;

@Test
public void testMyPrivateMethod() throws Exception {

underTest = new MyClass();

Class[] parameterTypes = new Class[1];
parameterTypes[0] = java.lang.Long.class;

Method m = underTest.getClass().getDeclaredMethod("myPrivateMethod", parameterTypes);
m.setAccessible(true);

Object[] parameters = new Object[1];
parameters[0] = 5569L;

String result = (String) m.invoke(underTest, parameters);

//Do your assertions
assertNotNull(result);
}
}

Sunday, May 17, 2009

Integration testing with maven 2.0

One thing to keep in mind is that unit tests are not integration tests.

The characteristics of unit tests are :
- They test your code in isolation
- They must be fast because they have to be run a lot of times

The problem with unit testing is that even if they cover a lot of your code, you can still have errors on integration when you put all the pieces together. That's why you must create integration tests.

The characteristics of integration tests are :
- They tests all your pieces of code together.
- They are pretty slow because they can be fired in a context like a spring context. They rely on real database or web services.

Integration tests are slow so they must not be run in the same phase as unit tests. Unit testing must be run in the maven test phase while integration tests must be run in the maven integration-test phase. The problem is that maven doesn't help you with that.

The trick is to customize the maven surefire plugin. You have to write your integration tests in a specific package and exclude them from the execution of the maven test phase. Then, you have to bind the execution of your integration tests to the maven integration-test phase.

Here's how you do that :
<plugin>
<groupId>org.apache.maven.plugins</groupId>
<artifactId>maven-surefire-plugin</artifactId>
<configuration>
<excludes>
<exclude>**/integration/*Test.java</exclude>
</excludes>
</configuration>
<executions>
<execution>
<id>integration-tests</id>
<phase>integration-test</phase>
<goals>
<goal>test</goal>
</goals>
<configuration>
<skip>false</skip>
<excludes>
<exclude>none</exclude>
</excludes>
<includes>
<include>**/integration/*Test.java</include>
</includes>
</configuration>
</execution>
</executions>
</plugin>
A common thing to do is to start a web server like Jetty in the pre-integration-test phase using the maven-jetty plugin.
<plugin>
<groupId>org.mortbay.jetty</groupId>
<artifactId>maven-jetty-plugin</artifactId>
<version>6.1.10</version>
<configuration>
<contextPath>/yourContextPath</contextPath>
</configuration>
<executions>
<execution>
<id>start-jetty</id>
<phase>pre-integration-test</phase>
<goals>
<goal>run-exploded</goal>
</goals>
<configuration>
<scanIntervalSeconds>0</scanIntervalSeconds>
<daemon>true</daemon>
</configuration>
</execution>
</executions>
</plugin>

You can even populate your database in the pre-integration-test phase with the dbunit-maven plugin if you need to add specific test case in your database.

Maybe maven 3.0 will improve the integration of integration testing in the maven process. A good solution would be to have something similar to the test phase like a src/it directory where you will put all your integration tests.

Updated on July 23, 2009 :

Another solution is to use the Maven Failsafe Plugin. The Failsafe Plugin is a fork of the Surefire plugin designed to run integration tests.

By default, the Surefire plugin executes **/Test*.java, **/*Test.java, and **/*TestCase.java test classes. The Failsafe plugin will look for **/IT*.java, **/*IT.java, and **/*ITCase.java

Take a look at this article on Sonatype Blog.

Saturday, May 16, 2009

A simple example of the State Design Pattern

Here's the formal definition of the state design pattern :

The State Pattern allows an object to alter its behavior when its internal state changes. The object will appear to change its class.


The UML diagram :


If you don't understand this obscure definition nor the UML diagram, don't worry. I made a simple example for you. The state pattern is just a clean way for an object to partially change its type at runtime.

Let's take a pizza store. A pizza store is cooking pizza, baking it and delivering it to their clients. Our pizza is the context object with a state.

So here's how you do that the old fashion way :


Pizza.class

public class Pizza {

public final static int COOKED = 0;
public final static int BAKED = 1;
public final static int DELIVERED = 2;

private String name;

int state = COOKED;

public String getName() {
return name;
}

public void setName(String name) {
this.name = name;
}

public int getState() {
return state;
}

public void setState(int state) {
this.state = state;
}

public void bake() throws Exception {

if(state == COOKED) {
System.out.print("Baking the pizza...");
state = BAKED;
}
else if(state == BAKED) {
throw new Exception("Can't bake a pizza already baked");
}
else if(state == DELIVERED) {
throw new Exception("Can't bake a pizza already delivered");
}
}

public void deliver() throws Exception {

if(state == COOKED) {
throw new Exception("Can't deliver a pizza not baked yet");
}
else if(state == BAKED) {
System.out.print("Delivering the pizza...");
state = DELIVERED;
}
else if(state == DELIVERED) {
throw new Exception("Can't deliver a pizza already delivered");
}
}
}

The problem with this implementation is that everything is going messy when you have a lot of state. Moreover, the add of a new state is not that simple.

Let's see the re-factored example using the State Design Pattern.

Firstable, we have to write the state interface. This interface will describe the different transitions.


PizzaState.class

public interface PizzaState {

void bake() throws Exception;

void deliver() throws Exception;
}

Then, we refactor our Pizza object with our new state interface.


Pizza.class

public class Pizza {

PizzaState cookedState;
PizzaState bakedState;
PizzaState deliveredState;

private String name;

//State initialization
private PizzaState state = cookedState;

public Pizza() {
cookedState = new CookedPizzaState(this);
bakedState = new BakedPizzaState(this);
deliveredState = new DeliveredPizzaState(this);
}

public String getName() {
return name;
}

public void setName(String name) {
this.name = name;
}

public PizzaState getState() {
return state;
}

public void setState(PizzaState state) {
this.state = state;
}

public void bake() throws Exception {
this.state.bake();
}

public void deliver() throws Exception {
this.state.deliver();
}

public PizzaState getCookedState() {
return createdState;
}

public PizzaState getBakedState() {
return bakedState;
}

public PizzaState getDeliveredState() {
return deliveredState;
}
}

And last but not least, we write the state implementations.


CookedPizzaState.class

public class CookedPizzaState implements PizzaState {

private Pizza pizza;

public CookedPizzaState(Pizza pizza) {
this.pizza = pizza;
}

public void bake() throws Exception {
System.out.print("Baking the pizza...");
pizza.setState(pizza.getBakedState());
}

public void deliver() throws Exception {
throw new Exception("Can't deliver a pizza not baked yet");
}

}

You still have to write BakedPizzaState.class and the DeliveredPizzaState.class.

The state design pattern is one of those you need to know and master. It can help you in complex situations.

Entreprise Integration Pattern with Apache Camel 2.0

Apache Camel is an open source messaging routing framework based on the enterprise integration pattern described in the book of the same name written by Gregor Hohpe and Bobby Woolf.

Apache Camel can easily work with any kind of transport or messaging model such as HTTP, JMS, CXF, POP and a lot of others.

Camel lets you create the Enterprise Integration Patterns to implement routing and mediation rules in either Java based DSL (Domain Specific Language), via Spring configuration files or via the Scala DSL .

Personally, I recommend using the Java DSL which is maybe a bit confusing at first sight but is very powerful in the end. The benefits of using the Java DSL is that your IDE can smart complete your code as you start typing, rather than having to mess around with buckets of XML.

Let's try with an example. We have a CSV file containing candidates for a job. Each line represents the candidates characteristics (name, size and age).

Our goal is to process this file, find if the candidate is suitable for the job and then send the result in XML into a JMS queue.

First, let's create our CSV file named testfile.csv in the src/test/resources directory with the content below :

Georges,14,168
Alain,58,175
Jean,67,168

To start our Camel example, we have to create a route by implementing the RouteBuilder interface.

CandidateRouteBuilder.java
package com.jdechmann.proto.camel.route;

import java.util.List;

import org.apache.camel.builder.RouteBuilder;
import org.apache.camel.dataformat.xstream.XStreamDataFormat;

import com.jdechmann.proto.vo.Candidate;
import com.thoughtworks.xstream.XStream;

public class CandidateRouteBuilder extends RouteBuilder {

@Override
public void configure() throws Exception {

XStream xstream = new XStream();
xstream.processAnnotations(Candidate.class);

XStreamDataFormat xStreamDataFormat = new XStreamDataFormat();
xStreamDataFormat.setXStream(xstream);

//Intercept the exceptions
onException(Exception.class)
.handled(true)
//Convert the object to XML
.marshal(xStreamDataFormat)
//Send the result to a JMS queue
.to("jms:queue.candidate.rejected");

//THE ROUTE STARTS HERE

//Consume from CSV files
from("file:src/test/resources/?fileName=testfile.csv")
//Unmarshal CSV files. The resulting message contains a List<List<String>>
.unmarshal().csv()
//Split the message into a number of pieces
.split(body(List.class))
//Convert the message into a Person object
.convertBodyTo(Candidate.class)
//Process the candidates
.process(new CandidateProcessor())
//Convert the object to XML
.marshal(xStreamDataFormat)
//Send the result to a JMS queue
.to("jms:queue.candidate.selected");
}
}

The spring configuration file contains the location of the RouteBuilder classes and the configuration of the JMS broker. You will need to have an activeMQ server running to make this example works.

applicationContext.xml
<?xml version="1.0" encoding="UTF-8"?>
<beans xmlns="http://www.springframework.org/schema/beans"
xmlns:xsi="http://www.w3.org/2001/XMLSchema-instance"
xmlns:context="http://www.springframework.org/schema/context"
xmlns:camel="http://camel.apache.org/schema/spring"
xsi:schemaLocation="
http://www.springframework.org/schema/beans
http://www.springframework.org/schema/beans/spring-beans-2.5.xsd
http://www.springframework.org/schema/context
http://www.springframework.org/schema/context/spring-context-2.5.xsd
http://camel.apache.org/schema/spring
http://camel.apache.org/schema/spring/camel-spring.xsd">

<bean id="camelTracer" class="org.apache.camel.processor.interceptor.Tracer">
<property name="traceOutExchanges" value="true" />
</bean>

<bean id="traceFormatter" class="org.apache.camel.processor.interceptor.DefaultTraceFormatter">
<property name="showOutBody" value="true" />
<property name="showOutBodyType" value="true" />
</bean>

<camelContext id="camel" xmlns="http://camel.apache.org/schema/spring">
<package>com.jdechmann.proto.camel.route</package>
</camelContext>

<bean id="jms" class="org.apache.activemq.camel.component.ActiveMQComponent">
<property name="brokerURL" value="tcp://localhost:61616"/>
</bean>

</beans>

Then we have to create our Java business object.

Candidate.java
package com.jdechmann.proto.vo;

import com.thoughtworks.xstream.annotations.XStreamAlias;

@XStreamAlias("candidate")
public class Candidate {

private String name;
private int age;
private int size;

public String getName() {
return name;
}
public void setName(String name) {
this.name = name;
}
public int getAge() {
return age;
}
public void setAge(int age) {
this.age = age;
}
public int getSize() {
return size;
}
public void setSize(int size) {
this.size = size;
}

@Override
public String toString() {
return "Candidate - " + " Name: " + name +
" Age: " + age + " Size: " + size;
}
}

Here's the processor which have to implement the camel Processor interface.
This class will send an exception if the candidate does not fit for the job.

CandidateProcessor.java
package com.jdechmann.proto.camel.route;

import org.apache.camel.Exchange;
import org.apache.camel.Processor;

import com.jdechmann.proto.vo.Candidate;

/**
* Process a Candidate object
* Throw an exception if the candidate does not
* match the criterias
*/
public class CandidateProcessor implements Processor {

@Override
public void process(Exchange exchange) throws Exception {
Candidate candidate = exchange.getIn().getBody(Candidate.class);

if(candidate.getAge() > 60 || candidate.getSize() < 160)
throw new Exception("Candidate refused " + candidate.toString());
else
System.out.println("Candidate accepted " + candidate.toString());
}
}

In order to convert the message body into a Candidate object, you need to tell Camel where to find your converter class. Camel will look in the classpath for a file named TypeConverter in META-INF/services/org/apache/camel/ directory. The TypeConverter file must contains the name of your package (com.jdechmann.proto.camel.converter in our case).

CandidateConverter.java
package com.jdechmann.proto.camel.converter;

import java.util.List;

import org.apache.camel.Converter;
import com.jdechmann.proto.vo.Candidate;

@Converter
public class CandidateConverter {

@Converter
public Candidate toCandidate(List personArray) {

Candidate candidate = new Candidate();
candidate.setName(personArray.get(0));
candidate.setAge(Integer.valueOf(personArray.get(1)));
candidate.setSize(Integer.valueOf(personArray.get(2)));

return candidate;
}
}

Finally, here's our Main class to start our route.

Main.java
package com.jdechmann.proto;

import org.apache.camel.CamelContext;
import org.springframework.context.ApplicationContext;
import org.springframework.context.support.ClassPathXmlApplicationContext;

public class Main {

public static void main(String[] args) throws Exception {
ApplicationContext context =
new ClassPathXmlApplicationContext("applicationContext.xml");

//Starting the camel context
CamelContext camel = (CamelContext) context.getBean("camel");
camel.start();
}
}

If you're using maven, you will need to add the following dependencies to you POM file.
<dependency>
<groupId>org.apache.camel</groupId>
<artifactId>camel-spring</artifactId>
<version>2.0-M1</version>
</dependency>
<dependency>
<groupId>org.apache.camel</groupId>
<artifactId>camel-core</artifactId>
<version>2.0-M1</version>
</dependency>
<dependency>
<groupId>org.apache.camel</groupId>
<artifactId>camel-jms</artifactId>
<version>2.0-M1</version>
</dependency>
<dependency>
<groupId>org.apache.camel</groupId>
<artifactId>camel-csv</artifactId>
<version>2.0-M1</version>
</dependency>
<dependency>
<groupId>org.apache.camel</groupId>
<artifactId>camel-xstream</artifactId>
<version>2.0-M1</version>
</dependency>
If you want to see the route traces, add log4j in your dependencies
<dependency>
<groupId>log4j</groupId>
<artifactId>log4j</artifactId>
<version>1.2.14</version>
</dependency>
And add a log4j.properties in your classpath

# Set root category priority to INFO and its only appender to CONSOLE.
log4j.rootCategory=DEBUG, CONSOLE

# CONSOLE is set to be a ConsoleAppender using a PatternLayout.
log4j.appender.CONSOLE=org.apache.log4j.ConsoleAppender
log4j.appender.CONSOLE.layout=org.apache.log4j.PatternLayout
log4j.appender.CONSOLE.layout.ConversionPattern=- %m%n

You can download the code of this example from this URL
Monday, May 11, 2009

Validation of nested properties with Oval 1.3x

When I used Oval for the first time I didn't realize right away that Oval didn't validate nested properties.

At the beginning of the project I was working on, I had simple objects with simple types like String or int. But my objects evolved in a more complex way with nested objects in it. I was very disappointed when I ran my Oval validator and didn't see the outcome I expected.

I found the solution on this blog and customize it a little bit.

The solution consists of creating an annotation and a custom validator class which wrap the OVal validator.

Here's the implementation.

Firstable we have to create the annotation.
import java.lang.annotation.ElementType;
import java.lang.annotation.Retention;
import java.lang.annotation.RetentionPolicy;
import java.lang.annotation.Target;

@Retention(RetentionPolicy.RUNTIME)
@Target(ElementType.FIELD)
public @interface ValidateNestedProperty {

}
The second step is to wrap the OVal validator into our own Validator class like this :
import java.lang.reflect.Field;
import java.util.ArrayList;
import java.util.List;

import net.sf.oval.ConstraintViolation;

/**
* Default oval implementation does not validate nested property
*
* @author Julien Dechmann
*
*/
public class CustomOValValidator {

private net.sf.oval.Validator validator;

public CustomOValValidator() {
validator = new net.sf.oval.Validator();
}

/**
* Process the validation
* @param objectToValidate
*/
public List validate(Object objectToValidate) {
return doValidate(objectToValidate, new ArrayList() );
}

private List doValidate(Object target, List errors) {

List violations = validator.validate(target);

if(violations != null)
errors.addAll(violations);

Field[] fields = getFields(target);

for (Field field : fields) {
ValidateNestedProperty validate = field.getAnnotation(ValidateNestedProperty.class);

if(validate!=null) {
if (!field.isAccessible()) {
field.setAccessible(true);
}

Object nestedProperty;

try {
nestedProperty = field.get(target);
} catch (Exception ex) {
throw new RuntimeException("Reflexion error", ex);
}

if(nestedProperty!=null)
doValidate(nestedProperty, errors);
}
}
return errors;
}

/**
* Return the list of fields from an object
* @param clazz
* @return
*/
@SuppressWarnings("unchecked")
public static Field[] getFields(Object target) {
Class clazz = target.getClass();
return clazz.getDeclaredFields();
}
}

Let's write a simple example.

NestedBusinessObject.java :

import net.sf.oval.constraint.NotEmpty;
import net.sf.oval.constraint.NotNull;

/**
* Nested business object
*/
public class NestedBusinessObject {

@NotNull
@NotEmpty
private String property;

public String getProperty() {
return property;
}
public void setProperty(String property) {
this.property = property;
}
}
Here's the business object we want to validate :

BusinessObject.java
import net.sf.oval.constraint.NotEmpty;
import net.sf.oval.constraint.NotNull;

public class BusinessObject {

@NotNull
private int id;

@NotNull
@NotEmpty
private String name;

@ValidateNestedProperty
private NestedBusinessObject nestedBusinessObject;

public int getId() {
return id;
}
public void setId(int id) {
this.id = id;
}
public String getName() {
return name;
}
public void setName(String name) {
this.name = name;
}
public NestedBusinessObject getNestedBusinessObject() {
return nestedBusinessObject;
}
public void setNestedBusinessObject(NestedBusinessObject nestedBusinessObject) {
this.nestedBusinessObject = nestedBusinessObject;
}
}

And the JUnit 4 test class :
import java.util.List;
import net.sf.oval.ConstraintViolation;

import org.junit.Before;
import org.junit.Test;

public class BuisinessObjectValidationTest {

private BusinessObject businessObject;

@Before
public void before() {
businessObject = new BusinessObject();
businessObject.setId(3455);
businessObject.setName("My business object");

//Since the property of the nestedBusinessObject
//is empty, the validation of the businessObject
//should return a ConstraintViolation
NestedBusinessObject nestedBusinessObject = new NestedBusinessObject();
nestedBusinessObject.setProperty("");

businessObject.setNestedBusinessObject(nestedBusinessObject);
}

/**
* Test with the OVal validator
*/
@Test
public void testValidationWithOvalValidator() {
net.sf.oval.Validator validator = new net.sf.oval.Validator();
List violations = validator.validate(businessObject);

System.out.println("testValidationWithOvalValidator " +
"- Number of errors: "+violations.size());
}

/**
* Test with the custom validator
*/
@Test
public void testValidationWithCustomValidator() {
CustomOValValidator validator = new CustomOValValidator();
List violations = validator.validate(businessObject);

System.out.println("testValidationWithCustomValidator " +
"- Number of errors: "+violations.size());
}
}

The output of the execution of this test is :
testValidationWithOvalValidator - Number of errors: 0
testValidationWithCustomValidator - Number of errors: 1
The custom validator found 1 error . On the contrary, the OVal validator found none.

Sunday, May 10, 2009

Good unit testing with JMock 2

Sometimes it can be difficult to unit test objects like services which can return multiple errors. A good unit testing strategy is to test every part of your code. JMock can help you do that by mocking your objects and code what they will return. You don't need to create your mock objects anymore.

Here's an example.

Account.java :
package com.jmock.vo;

public class Account {

private String id;
private String name;
private boolean activated;

public String getId() {
return id;
}
public void setId(String id) {
this.id = id;
}
public String getName() {
return name;
}
public void setName(String name) {
this.name = name;
}
public boolean isActivated() {
return activated;
}
public void setActivated(boolean activated) {
this.activated = activated;
}
}

AccountServicesImpl.java is the class under test.

AccountServicesImpl.java :
package com.jmock.services.impl;

import org.springframework.beans.factory.annotation.Autowired;

import com.jmock.dao.AccountDAO;
import com.jmock.general.ErrorConst;
import com.jmock.services.exception.AccountServicesException;
import com.jmock.vo.Account;

public class AccountServicesImpl {

@Autowired
private AccountDAO accountDAO; //Spring injected

public Account getAccount(String id) throws AccountServicesException {
Account account = accountDAO.selectAccount(id);

if(account == null)
throw new AccountServicesException(ErrorConst.ERROR_ACCOUNT_UNKNOWN);

if(!account.isActivated())
throw new AccountServicesException(ErrorConst.ERROR_ACCOUNT_INACTIVE);

return account;
}
}

As you can see, there is 3 scenarios to implement :
- The normal test case
- The account unknown test case
- The account inactive test case

And here's the test class.

AccountServicesTest.java :

import static org.junit.Assert.assertEquals;
import static org.junit.Assert.fail;

import java.lang.reflect.Field;

import org.jmock.Expectations;
import org.jmock.Mockery;
import org.jmock.integration.junit4.JMock;
import org.jmock.integration.junit4.JUnit4Mockery;
import org.junit.Before;
import org.junit.Test;

import com.jmock.dao.AccountDAO;
import com.jmock.general.ErrorConst;
import com.jmock.services.exception.AccountServicesException;
import com.jmock.services.impl.AccountServicesImpl;
import com.jmock.vo.Account;
import org.junit.runner.RunWith;

@RunWith(JMock.class)
public class AccountServicesTest {

//Mock context
private Mockery context;

private AccountDAO accountDAO;

private AccountServicesImpl underTest;

@Before
public void before() throws Exception {
context = new JUnit4Mockery();
accountDAO = context.mock(AccountDAO.class);

underTest = new AccountServicesImpl();

//We use reflection to access the private field
Field fieldCurrencyServices = underTest.getClass().getDeclaredField("accountDAO");
fieldCurrencyServices.setAccessible(true);
fieldCurrencyServices.set(underTest, accountDAO);
}

@Test
public void testGetAccount() {
final Account account = new Account();
account.setId("124110002055");
account.setActivated(true);

context.checking(new Expectations() {{
oneOf (accountDAO).selectAccount(with(account.getId()));
will(returnValue(account));
}});

try {
underTest.getAccount(account.getId());
} catch (AccountServicesException ex) {
ex.printStackTrace();
fail("No exception expected");
}
}

@Test
public void testGetUnknownAccount() {
final Account account = new Account();
account.setId("124110002055");
account.setActivated(true);

context.checking(new Expectations() {{
oneOf (accountDAO).selectAccount(with(account.getId()));
will(returnValue(null));
}});

try {
underTest.getAccount(account.getId());
} catch (AccountServicesException ex) {
assertEquals(ErrorConst.ERROR_ACCOUNT_UNKNOWN, ex.getErrorId());
}
}

@Test
public void testGetInactiveAccount() {
final Account account = new Account();
account.setId("124110002055");
account.setActivated(false);

context.checking(new Expectations() {{
oneOf (accountDAO).selectAccount(with(account.getId()));
will(returnValue(account));
}});

try {
underTest.getAccount(account.getId());
} catch (AccountServicesException ex) {
assertEquals(ErrorConst.ERROR_ACCOUNT_INACTIVE, ex.getErrorId());
}
}
}

Here's are the dependencies you need to add to your pom.xml
<dependency>
<groupId>org.jmock</groupId>
<artifactId>jmock</artifactId>
<version>2.5.1</version>
</dependency>
<dependency>
<groupId>org.jmock</groupId>
<artifactId>jmock-junit4</artifactId>
<version>2.5.1</version>
</dependency>

Friday, May 8, 2009

Using the iBATOR eclipse plugin for iBATIS code generation

This tutorial explains how to use the iBATOR eclipse plugin 1.2.0 for iBATIS.

iBATOR is a code generator for iBATIS. iBATOR will introspect one or more database table and will generate iBATIS artifacts that can be used to access the tables.

iBATOR will generate the following artifacts :

- SqlMapXML files (XML files used by iBATIS to map objects and data).
- Java model classes (Match the fields of the table).
- Dao classes (Implements the CRUD operations).

You will still need to hand code SQL and objects for custom queries, or stored procedures.

But what happen to your custom SQL queries when you re-launch iBATOR. Don't worry, any hand coded additions to generated Java classes or SqlMap files will remain undisturbed. The eclipse plugin will merge Java and XML Files.

Let's start,

1. First of all, install the ibator plugin for eclipse using the update site http://ibatis.apache.org/tools/ibator

2. Create a simple java project named ibator. if you have multiple projects, it's a good practice to isolate the ibator generation part. Since I use iBATOR in a pretty big financial project, I have multiple maven module like project-persistence, project-core, project-server, etc... I generate the DAO classes in the persistence project and the domain objects in the core project. If you are, like me, writing some customs plugins for iBATOR, you can put these classes in the ibator project and not polluting your other projects.

3. Right click on your new ibator project and if the plugin is correctly installed, you'll see the entry 'Add iBATOR to the build path'. Click on it.

4. Create the configuration file ibatorConfig.xml

<?xml version="1.0" encoding="UTF-8"?>
<!DOCTYPE ibatorConfiguration
PUBLIC "-//Apache Software Foundation//DTD Apache iBATIS Ibator Configuration 1.0//EN"
"http://ibatis.apache.org/dtd/ibator-config_1_0.dtd">

<ibatorConfiguration>
<ibatorContext
id="ibatorContext"
targetRuntime="Ibatis2Java5"
defaultModelType="flat">

<ibatorPlugin type="org.apache.ibatis.ibator.plugins.SerializablePlugin"/>

<jdbcConnection
driverClass="oracle.jdbc.driver.OracleDriver"
connectionURL="jdbc:oracle:thin:@host:1521:dbname"
userId="user"
password="password">
</jdbcConnection>

<javaModelGenerator targetPackage="com.yourcompany.vo"
targetProject="yourEclipseProject">
<property name="enableSubPackages" value="true" />
<property name="trimStrings" value="true" />
</javaModelGenerator>

<sqlMapGenerator targetPackage="com.yourcompany.dao.ibatis.ibatis.maps"
targetProject="yourEclipseProject">
<property name="enableSubPackages" value="true" />
</sqlMapGenerator>

<daoGenerator type="SPRING"
targetPackage="com.yourcompany.dao"
implementationPackage="com.yourcompany.dao.ibatis.impl"
targetProject="yourEclipseProject">
<property name="enableSubPackages" value="true" />
<property name="methodNameCalculator" value="extended" />
</daoGenerator>

<table tableName="MY_TABLE" domainObjectName="yourObject">

</ibatorContext>
</ibatorConfiguration>

I use some special properties in this file. To fully understand the configuration file, see the online documentation.

5. Create a build.xml file at the root of your ibator project.

<project default="runIbator">

<target name="runIbator">
<eclipse.convertPath resourcepath="ibator/resources/ibatorConfig.xml" property="thePath"/>
<ibator.generate configfile="${thePath}" ></ibator.generate>
</target>

</project>

6. Create a lib directory and put your ojdbc jar in it.

7. Create an external tool to run ibator. Go to Run/External tools/External tools configuration... and create a new Ant build configuration. In the main tab, select your build.xml file in the buildfile part. Add your ojdbc jar file in the classpath tab. In the JRE tab, tick 'Run in the same JRE as the workspace'.

8. Run the tool.

Another way would be to use the 'Generate Ibatis artifacts' instead of an external tool when you right click on your project. The problem is, in that case, you don't have any control over the classpath. Since I create custom plugins for iBATOR, I need to add these classes to the classpath.

To conclude, iBATOR is a great tool if you manage to make it work. It can save you a lot of time at the beginning of a project generating all the DAOs and the domain objects.

Monday, April 13, 2009

Using the Singleton Design Pattern in a multithreaded environment

Let's take a look first at the definition of the Singleton Pattern.

The Singleton Pattern ensures a class has only one instance, and provides a global point of access to it.

Here the implementation of this definition :

public class Singleton {

/** The unique instance **/
private static Singleton instance;

/** The private constructor **/
private Singleton() {}

public static Singleton getInstance() {
if (instance == null) {
instance = new Singleton();
}
return instance;
}
}

There is a problem with the code above in a multithreaded environment. Two threads might get ahold of two different instances if they enter at same time in the getInstance method.

So how to deal with multithreading ?

This problem can be fixed using the synchronized keyword.

public class Singleton {

/** The unique instance **/
private static Singleton instance;

/** The private constructor **/
private Singleton() {}

public static synchronized Singleton getInstance() {
if (instance == null) {
instance = new Singleton();
}
return instance;
}
}

The getInstance method is now synchronized so we force every threads to wait its turn before it can enter the method. This solution fixes our problem but it is very expensive. Indeed we only need synchronization for the first call. After that synchronization is totally unneeded. Remember that synchronization decreases performance by a factor of 100.

A solution consists of relying on the JVM to create our instance when the class is loaded. You can use this solution if the overhead of the creation and runtime aspects of the singleton are not onerous.

public class Singleton {

/** The unique instance **/
private static Singleton instance = new Singleton();

/** The private constructor **/
private Singleton() {}

public static Singleton getInstance() {
return instance;
}
}
Since Java 1.5, there is a new approach to implement Singletons. Simply make it an enum type :

public enum Singleton {

INSTANCE;

//Singleton method
public void someMethod( ) {...}
}
Accessing the enum singleton :
Singleton.INSTANCE.someMethod( );

If you don't want to automatically create an instance of your singleton when the JVM start, there is another solution called "double-checked locking". With this solution, we first check to see if an instance is created and only then we synchronize. This way we only synchronize the first call and there's no performance issue anymore. Another requirement is to use the volatile keyword for the Singleton instance.

public class Singleton {

/** The unique instance **/
private volatile static Singleton instance;

/** The private constructor **/
private Singleton() {}

public static Singleton getInstance() {
if (instance == null) {
synchronized(Singleton.class) {
if (instance == null) {
instance = new Singleton();
}
}
}

return instance;
}
}

!!! This solution will not work in Java 1.4 or earlier. Many JVMs in Java version 1.4 and earlier contains implementation of the volatile keyword that allow improper synchronization fo double checed locking.

Here's an interresting article on the double-checked locking pattern and the use of the volatile keyword.

Another article in french.

Sunday, April 12, 2009

How to validate a XML document from a XML schema using javax.xml.validation.Validator

Since 1.5, you can validate a XML document from a XML schema using the javax.xml.validation.Validator object.

Here's a snippet of code showing how to use this validator.

import java.io.ByteArrayInputStream;
import java.io.File;
import java.io.IOException;
import java.io.InputStream;

import javax.xml.XMLConstants;
import javax.xml.parsers.DocumentBuilder;
import javax.xml.parsers.DocumentBuilderFactory;
import javax.xml.parsers.ParserConfigurationException;
import javax.xml.transform.Source;
import javax.xml.transform.dom.DOMSource;
import javax.xml.validation.Schema;
import javax.xml.validation.SchemaFactory;

import org.w3c.dom.Document;
import org.xml.sax.SAXException;


public class Main {

/**
* Will throw a SAXException if the XML document is not valid
* @param args
* @throws ParserConfigurationException
* @throws IOException
* @throws SAXException
*/
public static void main(String[] args) throws ParserConfigurationException,
SAXException, IOException {

String xml = "...";

//XML parsing
DocumentBuilderFactory docBuilderfactory = DocumentBuilderFactory.newInstance();
DocumentBuilder builder = docBuilderfactory.newDocumentBuilder();

InputStream is = new ByteArrayInputStream(xml.getBytes());
Document xmlDocument = builder.parse(is);
xmlDocument.getDocumentElement().normalize();

//XSD parsing
File xsd = new File("src/main/resources/xsd/yourXsd.xsd");
SchemaFactory schemaFactory = SchemaFactory.newInstance(XMLConstants.W3C_XML_SCHEMA_NS_URI);
Schema schema = schemaFactory.newSchema(xsd);

//Validation
javax.xml.validation.Validator validator = schema.newValidator();
Source source = new DOMSource(xmlDocument);
validator.validate(source);
}
}

This validator is very verbose. In a real application, a good practice is to create a component encapsulating the code above.

Sunday, April 5, 2009

Dependencies injection with Spring annotations (@Repository, @Service, @Autowired)

One of the big downfall with frameworks relying on XML configurations file is that they are not synchronized with your code. For example, if you are doing a refactoring of your code like renaming a package or a class, you need to update your XML files too. If you're not, you will end up with a configuration exception at runtime.

Spring 2.5 introduces injection dependencies by annotation with stereotypes annotation like @Repository, @Service, etc... and the @Autowired annotation.

Here's how you define your beans the old school way :

applicationContext.xml :

<beans xmlns="http://www.springframework.org/schema/beans"
xmlns:xsi="http://www.w3.org/2001/XMLSchema-instance"
xsi:schemaLocation="http://www.springframework.org/schema/beans
http://www.springframework.org/schema/beans/spring-beans-2.5.xsd">

<bean id="beanDAO_1" class="com.yourcompany.dao.BeanDAO_1_Impl"/>
...
<bean id="beanDAO_N" class="com.yourcompany.dao.BeanDAO_N_Impl"/>

<bean id="beanServices_1" class="com.yourcompany.services.BeanServices_1_Impl">
<property name="beanDAO_1" ref="beanDAO_1"/>
</bean>
...
<bean id="beanServices_N" class="com.yourcompany.services.BeanServices_N_Impl">
<property name="beanDAO_N" ref="beanDAO_N"/>
</bean>

</beans>

BeanDAO_1_Impl.class :

package com.yourcompany.dao.impl;

public class BeanDAO_1_Impl implements BeanDAO_1 {
...
}

BeanServices_1.class :

package com.yourcompany.services.impl;

public class BeanServices_1_Impl implements BeanServices_1 {
private BeanDAO_1 beanDAO_1;
...
public setBeanDAO_1(BeanDAO_1 beanDAO_1) {
this.beanDAO_1 = beanDAO_1;
}
}


Here's how you define your beans with spring annotations :

applicationContext.xml :

<beans xmlns="http://www.springframework.org/schema/beans"
xmlns:xsi="http://www.w3.org/2001/XMLSchema-instance"
xmlns:context="http://www.springframework.org/schema/context"
xsi:schemaLocation="http://www.springframework.org/schema/beans
http://www.springframework.org/schema/beans/spring-beans-2.5.xsd
http://www.springframework.org/schema/context
http://www.springframework.org/schema/context/spring-context-2.5.xsd"/>

<context:component-scan base-package="com.yourcompany.dao.impl"/>
<context:component-scan base-package="com.yourcompany.services.impl"/>
</beans>

BeanDAO_1_Impl.class :

package com.yourcompany.dao.impl;

@Repository("beanDAO_1")
public class BeanDAO_1_Impl implements BeanDAO_1 {
...
}

BeanServices_1.class :

package com.yourcompany.services.impl;

@Service("beanServices_1")
public class BeanServices_1_Impl implements BeanServices_1 {
@Autowired
private BeanDAO_1 beanDAO_1;
//No need of a setter anymore. Spring can inject the beanDAO_1
//even if it's a private properties
}

And that's how it's done... No more big XML configuration files.

Consult the spring documentation for a detailed explanation of the differences between the annotation sterotypes (@Repository, @Services, @Component ...)

Saturday, April 4, 2009

Object validation by annotations with the OVal framework

OVal is a validation framework for any kind of java objects. For example when you want to validate a JavaBean you just have to annotate its properties like this :


public class object {
@NotNull
@NotEmpty
@Length(max=32)
private String name;
}

To process the validation just call the OVal validator :

net.sf.oval.Validator validator = new net.sf.oval.Validator();
List violations = validator.validate(obj);

if(!violations.isEmpty())
{
//Do whatever you want
}

In a real world application you need sometimes to return an error code to the client depending on the error type. Do not worry, OVal is doing it for you. Just add the error code property in your annotations like this

public class object {
@NotNull(errorCode="46")
...
private String name;
}

You can retrieve the error code in each ConstraintViolation object with the getErrorCode() method.

OVal does not only validate JavaBeans.

By utilizing AspectJ, OVal provides support for several aspects of programming by contract - however it is not a full blown programming by contract implementation.

With OVal you can

  • enforce that a parameterized constructor/method is invoked only if the given arguments satisfy prior defined constraints (precondition)

  • enforce that a method is invoked only if the object is in a certain state (precondition/invariant)

  • enforce that the return value of a method must satisfy prior defined constraints (postcondition)

  • enforce that the object must be in a certain state after a method has been executed (postcondition/invariant)


I suggest you read the user guide for more detailed examples.

Here is the list of the OVAL annotations :
Assert Check if evaluating the expression in the specified expression language returns true.
AssertConstraintSet Check if the value satisfies the all constraints of specified constraint set.
AssertFalse Check if the value is false.
AssertFieldConstraints Check if the value satisfies the constraints defined for the specified field.
AssertTrue Check if the value is true.
AssertURL Check if the value is a valid URL.
AssertValid Check if the value passes a validation by Validator.validate().
CheckWith Check the value by a method of the same class that takes the value as argument and returns true if valid and false if invalid.
CheckWithMultiple Check the value with the given CheckWith constraints.
DateRange Check if the date is within the a date range.
EqualToField Check if value equals the value of the referenced field.
Future Check if the date is in the future.
HasSubstring Check if the string contains a certain substring.
InstanceOf Check if the value is an instance of the specified class or implements all specified interfaces.
InstanceOfAny Check if the value is an instance of the specified class or implements one of the specified interfaces.
Length Check if the string representation has certain length.
MatchPattern Check if the specified regular expression pattern is matched.
Max Check if the number is smaller than or equal to X.
MaxLength Check if the string representation does not exceed the given length.
MaxSize Check if an array or collection does not exceed the given size.
MemberOf Check if the string representation is contained in the given string array.
Min Check if the number is greater than or equal to X.
MinLength Check if the string representation has at least the given length.
MinSize Check if the array or collection has at least the given number of elements.
NoSelfReference Check that the value is not a reference to the validated object itself.
NotBlank Check if the string representation is not empty and does not only contain white spaces.
NotEmpty Check if the string representation is not empty ("").
NotEqual Check if the string representation does not equal a given string.
NotEqualToField Check if value does not equal the value of the referenced field.
NotMemberOf Check if the string representation is not contained in the given string array.
NotNegative Check if the number is greater or equal zero.
NotNull Check if not null.
Past Check if the date is in the past.
Range Check if the number is in the given range.
Size Check if the array or collection has the given size.
ValidateWithMethod Check the value by a method of the same class that takes the value as argument and returns true if valid and false if invalid.


First post

I called my blog java hell for a simple reason. Since I began developing in Java, things are getting more and more complicated along the way. Frameworks like Spring, hibernate, EJBs and others appeared. At the beginning, They were designed to simplify our work but in the end people tends to use them even for simple things. Moreover these frameworks are far from perfect and sometimes they are difficult to use due to their complexity and the lack of real examples or documentation.

I will share in this blog my experience in software development in order to help people to not make the same errors I did.